Posts

Showing posts from July, 2017

Portraiture - Artwork 5 - Body of Work - Drawing and Digital Art

Image
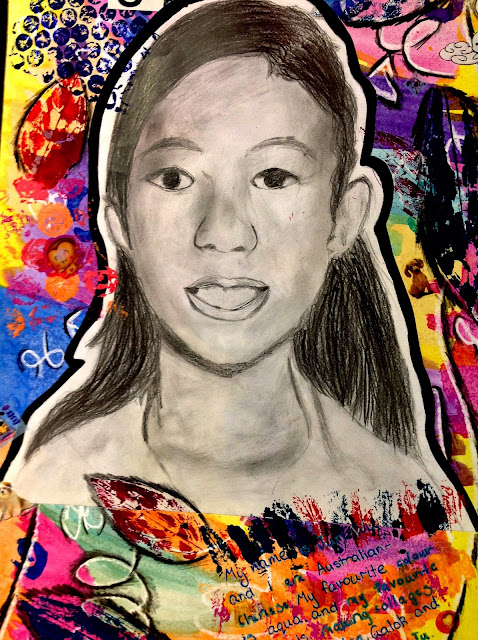
ARTWORK 5:  Layered Self Portrait  - Scrapbook Style  Finally, we took their grid self portrait drawing and created a layered mixed media artwork that was called, "It's Me". Was so impressed with what the students did. They loved the idea of layering media, adding collage and writing directly onto their artwork.  PROCEDURE: Preparing the Portrait: 1. Firstly, make a self portrait grid drawing. Shade with lead pencil to created elements of realism. 2. Leave about a .5cm gap from the edge of the portrait and draw a line that goes around the portrait. 3. Draw a second line about 1cm wide that follows the first line. 4. Colour in this 1cm wide line with black marker. The portrait drawing will appear to have a white and black outline. 5. Cut the portrait out along the edge of the black marker. Preparing the Background/Base: 6. We used a piece of A3  light coloured cardboard as the base to work from. The light colour added the "first layer" to the artwork.

Portraiture - Artwork 4 - Body of Work - Drawing and Digital Art

Image
ARTWORK 4:  Cubist style Artwork -  Percolator   iPad App PROCEDURE: 1. Again, we took a pic of their self portrait drawing and imported it into the program. 2. I had student use particular settings/effects that created easy to see circles. They would need to be able to see the edge of the circles to successfully complete Step 3. (Can't remember what the settings were...it was 4 years ago. You could play around with the settings/effects to achieve what you want) 3. With a fine tip Artline pen, students re-daw their original self portrait drawing. They must use the edges of the circles to create a distorted outline.    Some students struggled with this idea but once they got the hang of it, they were ok. Straight lines are forbidden!!!! 4. Using a thin black marker or a coloured Posca pen, students now trace over their Artline drawing to establish a clear outline. Thick markers or Posca pens will cover up too much detail. 5. Using stippling , students add tone to their artw

Portraiture - Artwork 3 - Body of Work - Drawing and Digital Art

Image
ARTWORK 3: Simulated Texture Artwork -  Repix  iPad App PROCEDURE: 1. We took a pic of their self portrait drawing and loaded it into the program. 2. Students then used a variety of filters to create "simulated texture". (I explained what this term meant).     It was interesting watch students decide where to put textures and which particular texture to use. It was encouraging to see them not being influenced by textures that where more visually stunning than others, but using textures that suited their needs.  Here are some of the results.......(my apologies for names on the artworks but it was what the students requested. I hope I have not breached any forms of privacy).......

Portraiture - Artwork 2- Body of Work - Drawing and Digital Art

Image
  ARTWORK 2: Pop Art Style Artwork - Imaengine iPad App I printed the Imaengine pics onto photo paper as it achieved a better quality image with strong colours and defined edges. I loved every single artwork that was created by my Year 7 students and their was a total of 60. Students just loved this particular artwork. Procedure: 1. Students are to draw around the edges of the face and body with a  to redefine the original portrait drawing thin black marker or coloured Posca pen. If the marker or pen is too thick, the details can become lost. 2. With metallic markers and/or Posca pens, students are to use stippling to build up tone within the shapes of the artwork. We practised the stippling effect before touching the artwork. 3. Students had to use opposing colours with their stippling. Warm vs. cool. Cool vs. warm. Here are some of the results....... Imaengine Image Completed Artwork (Just love this artwork!!!!)          

Portraiture - Artwork 1- Body of Work - Drawing and Digital Art

Image
   In 2013, I created a little series for my Year 7 students that began with a grid self portrait drawing. We took a pic of their finished drawing and loaded it into  some iPad apps. Imaengine was used to create a Pop Art style artwork and Repix was used to create a simulated texture artwork using a variety of special effects filters. Percolator was used to create a Cubist style artwork. They loved using technology, non-traditional and traditional drawing media. In total, each student had 5 artworks all based on or using their original self portrait drawing. This was their introduction to the idea of a Body of Work.     ARTWORK 1:     The grid drawing technique enabled students to achieve accuracy with their proportions of the face and some degree of realism with lead pencil shading and toning. I was pleased with the overall results and the students level of engagement was fantastic.

Dreamscope Portrait - Elements of Art Digital Artwork - Online Program

Image
    This artwork starts out as digital but ends up with other drawing media applied. It begins with an online program called Dreamscope. I did this artwork with one of my Year 7 classes.    1. The following instructions were created for my students to use at school and at home. I created a little booklet that I had printed for them. Students had 3 days in which to bring to me their Dreamscope image saved onto a USB. I then printed the image at home onto photo paper. Printing onto photo paper achieved a better quality print. I could also monitor who was working as expected an who was not!!!   INSTRUCTIONS:     2. The image was printed as monochromatic as I did not want colour to interfere with what the students had to do with the image. I wanted the students to create an artwork devoid of colour. They did question my decision but when the artwork was finished, they appreciated its lack of colour. 3. The A4 image is glued to an A3 sheet of bla