CLAY WORK INSTRUCTIONS - How to Make a Relief Sculpture Plate in Air Dry Clay

TEACHING RESOURCES:
I found most of the resources on Pinterest and organised them to suit my needs and those of the students.

I then spoke to them about the limitations of handling air dry clay - over handling it will cause the clay to dry out quite quickly. Students are always so tempted to play with pieces of clay!!!
We looked at the different types of construction methods and I explained how they would be using slabs, coils and pinch pots to make their relief sculpture. By this stage, the students were so excited so we started straight away. No point in dragging it out...

INSTRUCTIONS:1. We covered our mould (plastic plate) with Cling Wrap to stop the clay from sticking to it.
2. Make sure each student has newspaper to work on. If not, the clay will stick to the desk. I also put plastic table cloths on all the tables to lessen the mess and shorten our clean up time. I usually have students work on a piece of canvas but it was not available to us.
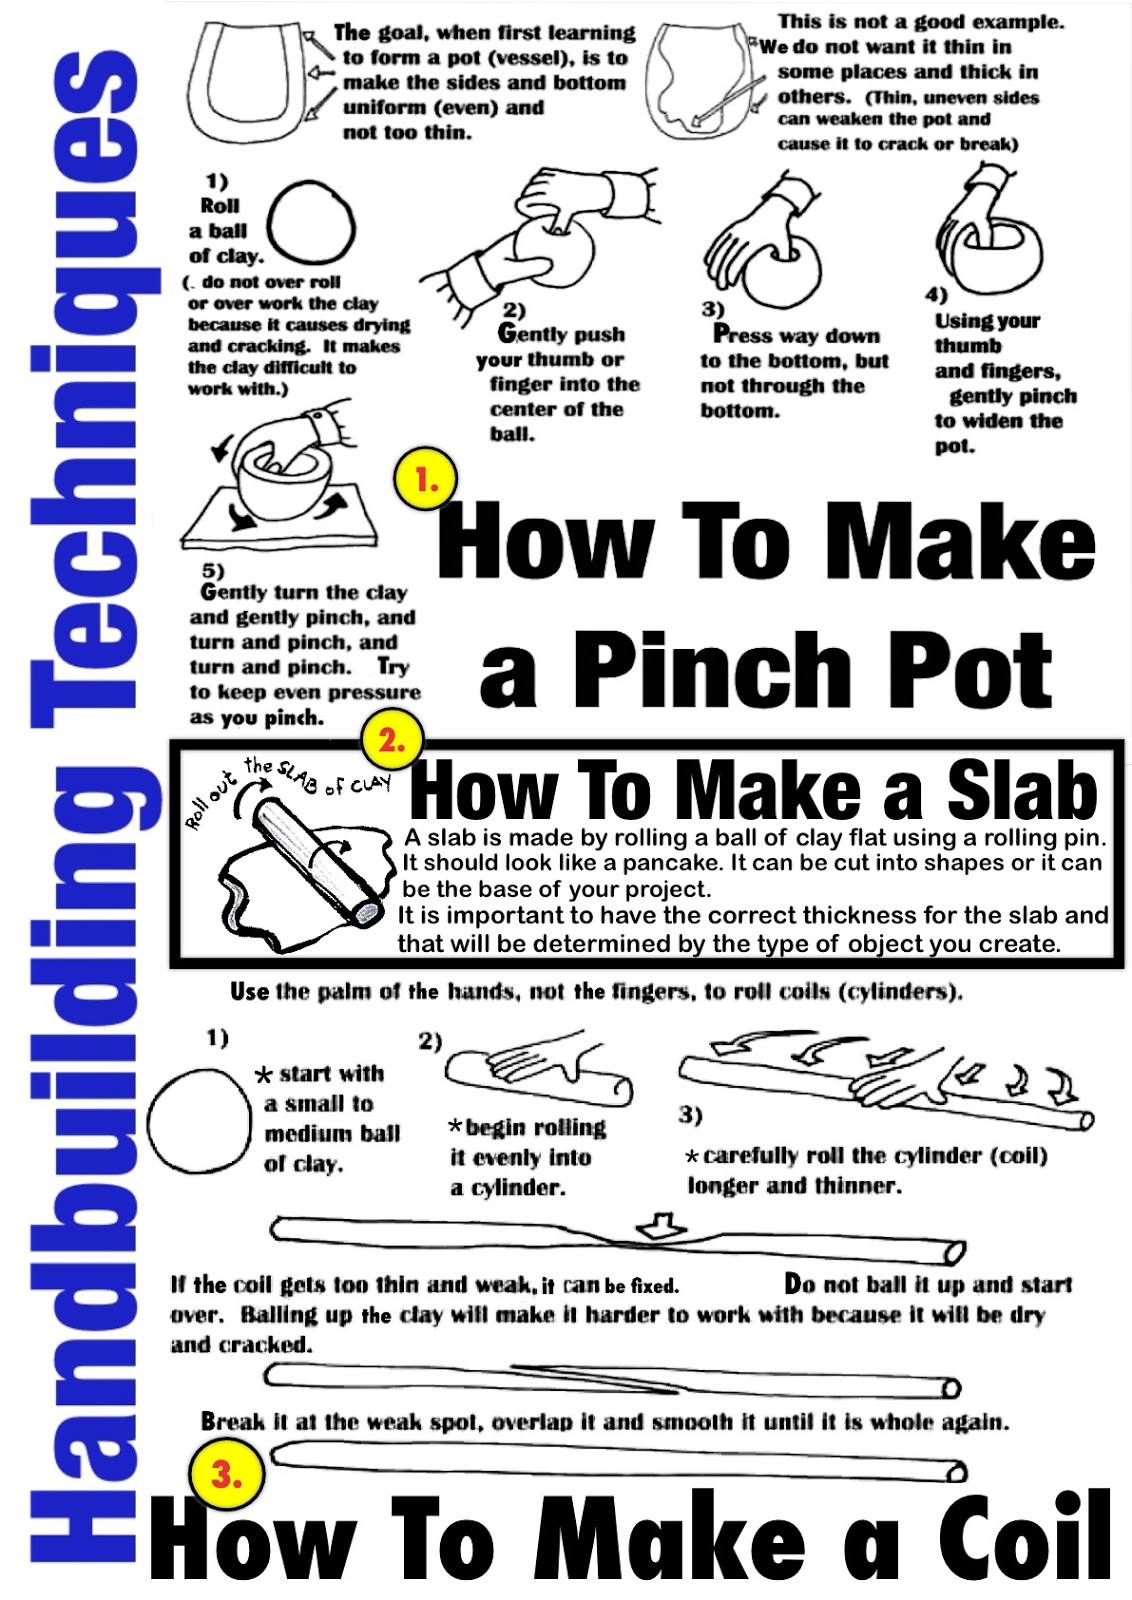
3. Each student was given a piece of clay which they shaped into a circle.
4. They then used a rolling pin to create a slab about .5cm thick. This was our first biggest hurdle for the day. Students had to be constantly reminded to roll the clay out from the middle of the slab. They focused on the edges which became very thin with a great bulge in the middle. We did eventually overcome the problem with a lot of help from me and help from some very good students who then became my peer support people. I recommend that if you can have peer support people within the class, it will make things go much more easily. Frustration levels can build up.
5. Once the slab was the size of the mould, it was picked up and laid onto the mould. Gently push the slab onto the mould and gently bend the clay over the edge of the mould. This allows students to see where the edge of the mould is. (Am I spelling the word "Mould" wrong?)
6. Our clay working tools consisted of plastic knives, plastic forks, plastic spoons and a barbeque bamboo skewer. Very inexpensive but just as effective as properly clay working tools. We also had a little bowl of water and a small sponge.
7. With a plastic knife, trim off the excess clay hanging over the mould edge. Its like trimming pastry off the edge of an apple pie.
8. Using clean fingers and water, smooth the edge and surface of the clay. Not too much water with air dry clay.
9. Students continue to make leaves using two different methods.
a. Slab - roll out a small ball of clay with a rolling pin to about .5cm thick. With the bbq skewer, cut out a leaf shape. Roll the leftover clay back into a ball to avoid it drying out.
NOTE: This technique worked well until students forgot to roll up their left over clay, so it dried out. We were beginning to have a lot of wasted clay so we used the second method.
b. Coil - roll out a coil (sausage) to the desired length of leaf. Shape one end of the coil to a point. Squash along the coil, flatten it from the thick end to the pointed end. Shape the leaf by blending it gently.
10. Before applying the leaf to the clay plate, rub a small amount of water on the back. This creates a "glue" that will hold the leaf in place.
NOTE: As we were using air dry clay, it was not vitally important to ensure no air bubbles were trapped but I didn't tell the students that. I had students create their relief plate as if it were going into the kiln.
11. Place the leaf in the desired position and gently push it onto the clay plate/base. Once the leaf is positioned, it cannot be removed. Well, it can but a horrible mess is made. Students need to be confident in what they are doing
NOTE: Students could create a design before commencing their relief sculpture but we didn't. I went with the "intuitive approach" to scene each student created on their plate.
12. Rocks were created using small slabs. Again, water was rubbed on the back to create the glue and the rock was secured into position. Little rocks were made using a small ball of clay that is simply pressed onto the clay surface.
d. Shape a head and neck from a coil.
MAKING A PINCH POT:
13. This was fun. The students imaginations were really firing by this stage. They wanted to make all sorts of water/pond creatures but I limited them to either frogs or turtles as I wanted them to use the pinch pot construction method.
14. Start with a small ball of clay. The ball of clay will determine how big the pinch pot will be.
a. Press your thumb into the centre of the ball and down towards the bottom of the ball (but not through the bottom)
b. With your thumb on the inside and your fingers on the outside of the ball, gently pinch around the edges. This will create a little bowl. The edge should be about .5cm thick.
NOTE: Some students made a pinch pot that was too big, so they had to start all over again. That was not a problem at all but the clay was drying out each time they started over.
TO MAKE OF FROG:
a. Pinch one end of the pinch pot together, shaping it is create the frog's bottom.
b. Slightly widen out the other end to create the frog's big mouth. NOTE: This widen end will become slightly raised later on to create an escape for any trapped air.
c. Rub water around the edge of the frog body and secure it to the leaf/rocks/pond scene. Be careful not to push down too hard or the little pot will collapse.
d. Roll out a coil that will become the leg. The length depends on the size of the body.
e. Bend the leg in half and flatten one end which will become the frog's foot. Gently squeeze the other end a bit thinner so it can be joined to the body.
f. Add water to the parts of the leg that attach to the body and the plate. Gently push them on, making sure they are secure.
g. With the edge of the plastic knife, create three little toes on the frog's foot.
g. Repeat Step f and Step g to make another leg and two front legs. The front legs do not have to bend, Bending those two legs is optional.
h. With the blade of the plastic knife, gently raise the frog's mouth so trapped air can now escape. Make sure at least some part of the pinch pot body is raised.
MAKING A TURTLE:
a. Again, tart with a small ball of clay. The ball of clay will determine how big the pinch pot will be.
a.Press your thumb into the centre of the ball and down towards the bottom of the ball (but not through the bottom)
b. With your thumb on the inside and your fingers on the outside of the ball, gently pinch around the edges. This will create a little bowl. The edge should be about .5cm thick.
b. Determine where on the turtle will be positioned. Rest the pinch pot there and make four little coils. These little coils are the turtle's legs.
c. Add water to the back of each little leg, lift up the pinch pot and secure it under the pot.
d. Shape a head and neck from a coil and secure the same way as you did the little legs.
e. When all four legs and head are in place, rub water around the edge of the pot and push it into position over the head and legs. Make sure it is secured but don't push too hard. The pot may collapse. Raise some part of the edge of the pot so that trapped air can escape.
DECORATION:
1. I demonstrated to students on my demo plate, how to use the plastic knives, forks and spoons and the bbq skewer to add TEXTURE to the leaves, rocks, frogs and turtles.
2. I also explained the CONSEQUENCES of drawing too deeply into the air dry clay. If the line descends too far into the clay, it will cause a great crack to occur as the clay dries. This snowballs into the plate cracking along other drawn lines and the plate falls into pieces.
3. I explained the DRY BRUSHING TECHNIQUE we will be using when painting our plates. I described to students how the raised texture areas pick up the paint as it is rubbed over those areas. Dry brushing is like shading with a pencil only it is done with a dry brush with very small amount of paint on the bristles. The students are now all very keen to investigate this way of painting.
4. The frog was decorated by gently pushing the round edge of the bbq skewer into the surface of the clay. Pretty simple.
5. We snapped off the prongs on the fork, leaving just one prong. This made it easier to get into tight places to add texture. The prong was pushed into the edges of leaves which were flattened.
6. The prong was used to scratch into the clay surface.
7. The point of the bbq skewer was pushed multiple times into and along the edge of leaves to created detailed texture.
8. The end of the spoon was used to create texture on rocks.
I have never used air dry clay before to create a sculpture this big. I have always used it to make small hand moulded objects.
I am hoping that the plates all dry successfully so that we can then paint them.
Some students had things break off their turtles like the neck and head but they can be glued back on after the work dries. No big deal there.
If I had known that I was to use air dry clay and it was terracotta in colour, I would have made something else with the students. But we went with the flow and everything worked out extremely well.
Feel free to modify any of the steps I used. You may know more about air dry clay than me and be able to make something else.
My goal in doing this particular sculpture was have the student learn the three basic construction techniques and move into 3D art making practises.
I was impressed with the students work. It was their first time in using clay to make an artwork.


Comments
Post a Comment