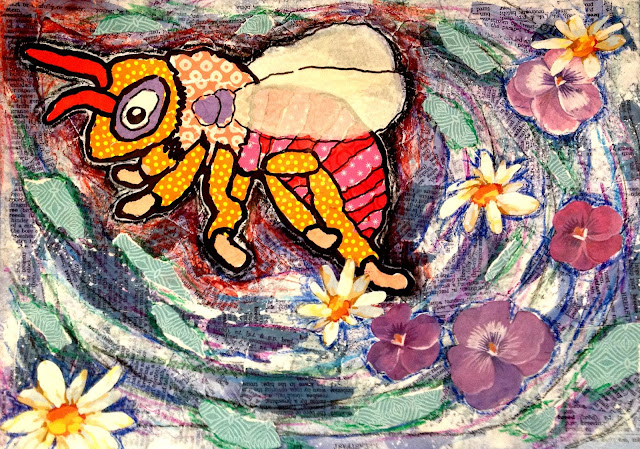
BUSY BEES - Mixed Media Artwork with Collage
I just love doing mixed media stuff with the kids as they seem less inclined to worry about realism and perfection. It took me 4 hours from start to finish to create this sample artwork so it will be a full day art lesson with my primary school kids. I forgot to take progress shots so the instructions will be pretty "wordy"....sorry....
INSTRUCTIONS:
The artwork is created in 3 parts, starting with the background.
A. BACKGROUND:
1. On an A3 piece of cardboard or thick paper, glue down a collage of blue paper. I found a vintage dictionary paper on Pinterest (free to use and the letter B) and coloured it in Photoshop. You need to use thick paper or card stock as the collaged papers need support.


5. I sprayed the entire artwork, making sure I covered where the Vaseline was applied. I let the artwork dry a little and then gave another quick spray. I put the artwork away to air dry.
B. THE BEE:
1. I found free-to-use colouring pages of bees and printed them onto A4 thick paper. The paper needs to thick to add support to the collaged image.
2. With coloured wrapping paper, I collaged the bee image. I tore the paper rather than using scissor. I selected "warm colours" as a scheme but students could use a mixture of colours, cool colours or warm colours. It's their choice.
I used wrapping paper as it was super cheap to buy, brightly coloured and suited the amount that was needed. I have heaps of it!!!!!
C. THE ARTWORK:
1. With a black marker, I drew a thicker outline around the bee and also highlighted some of it's body parts.
2. I then cut around the bee, using the thick black outline as my guide.
THE WINGS:
3. I used tissue paper to create the wings as I wanted wings that were semi-transparent. I folded two pieces of tissue paper in half, drew on a wing with lead pencil and tore it out. This gave me 4 wings.
4. I glued on the a single wing on the back of the bee, then glued another wing to that.
5. On the front of the bee, I glued a wing, then a the last wing on top of that. By attaching the wings this way, I created a little bit of 3-dimensionality.
 5. With oil crayons, I added some lines in tones of blue in a circular motion. I applied little pressure to the crayon as I did not want the lines to over power the image of the bee. The lines are more about adding movement to the artwork.
6. With black crayon, I did some shading around the bee. I also added some red shading to make the bee stand out from the background. The shading is more an application of colour than traditional shading.
7. In the background, I did some shading with a green oil crayon which highlighted some edges of the tore blue papers.

8. To add further to the background and feeling of movement, I added some cut out flowers (I cheated) and torn green leaves. I shaded around the flowers with a dark blue crayon and, around the leaves, with a dark green. The shading was more of a light scribble just to create a simple outline that was not overpowering.


INSTRUCTIONS:
The artwork is created in 3 parts, starting with the background.
A. BACKGROUND:
1. On an A3 piece of cardboard or thick paper, glue down a collage of blue paper. I found a vintage dictionary paper on Pinterest (free to use and the letter B) and coloured it in Photoshop. You need to use thick paper or card stock as the collaged papers need support.

2. I then placed the bee image on top so I could get an idea of where it would be in the artwork (composition) and how I would apply the Vaseline (petroleum jelly). The Vaseline creates a resist when paint is applied later on.
3. I applied the Vaseline with my fingers in a circular fashion which created a "frame" for my bee. I thin I put on too much Vaseline but it all worked out in the end. TIP: Putting the Vaseline on as a thin layer allows more paint to sink into the collaged background, thus more texture is achieved.
4. I diluted white acrylic paint in a small spray bottle. You need to experiment with the dilution as the paint should not be too thin. Too thick and it won't spray as a mist.5. I sprayed the entire artwork, making sure I covered where the Vaseline was applied. I let the artwork dry a little and then gave another quick spray. I put the artwork away to air dry.
B. THE BEE:
1. I found free-to-use colouring pages of bees and printed them onto A4 thick paper. The paper needs to thick to add support to the collaged image.
2. With coloured wrapping paper, I collaged the bee image. I tore the paper rather than using scissor. I selected "warm colours" as a scheme but students could use a mixture of colours, cool colours or warm colours. It's their choice.
I used wrapping paper as it was super cheap to buy, brightly coloured and suited the amount that was needed. I have heaps of it!!!!!
C. THE ARTWORK:
1. With a black marker, I drew a thicker outline around the bee and also highlighted some of it's body parts.
2. I then cut around the bee, using the thick black outline as my guide.
THE WINGS:
3. I used tissue paper to create the wings as I wanted wings that were semi-transparent. I folded two pieces of tissue paper in half, drew on a wing with lead pencil and tore it out. This gave me 4 wings.
4. I glued on the a single wing on the back of the bee, then glued another wing to that.
5. On the front of the bee, I glued a wing, then a the last wing on top of that. By attaching the wings this way, I created a little bit of 3-dimensionality.

6. With black crayon, I did some shading around the bee. I also added some red shading to make the bee stand out from the background. The shading is more an application of colour than traditional shading.
7. In the background, I did some shading with a green oil crayon which highlighted some edges of the tore blue papers.

8. To add further to the background and feeling of movement, I added some cut out flowers (I cheated) and torn green leaves. I shaded around the flowers with a dark blue crayon and, around the leaves, with a dark green. The shading was more of a light scribble just to create a simple outline that was not overpowering.


Comments
Post a Comment